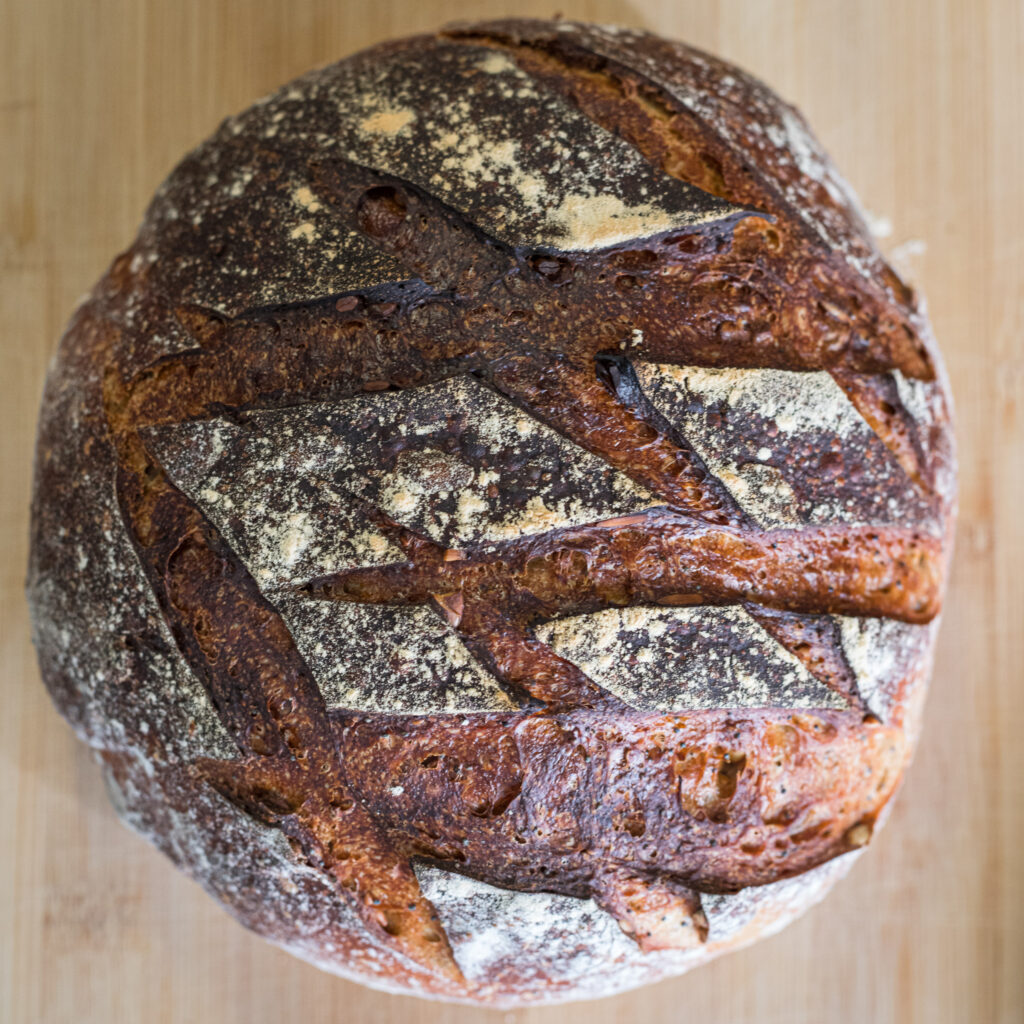
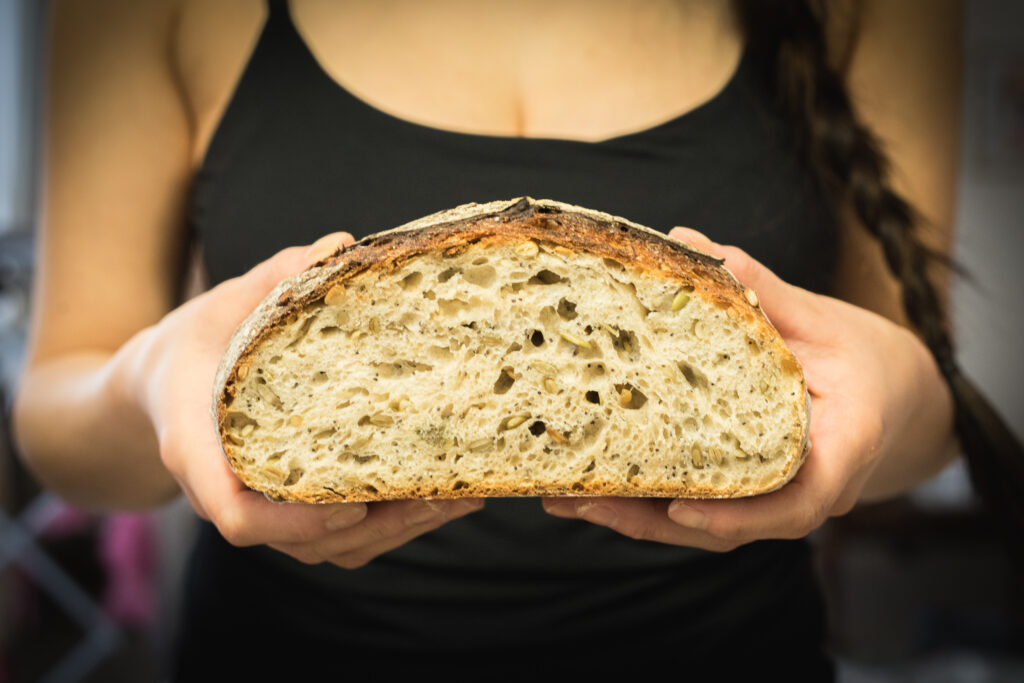
Over the course of my inquiry into the perfect loaf of sourdough bread I have made approximately three loaves of bread a week and sometimes much more. Some of them were successes while others were failures. At first, the failures outweighed the successes and my bread more closely resembled a brick than a loaf of bread—but we ate them anyways. Toast it and load it with butter or turn it into french toast, both work with bread that is less than perfect. The successes on the other hand were super tasty moments I loved sharing with my partner and friends. When a loaf of sourdough came out of the oven having sprung up over twice the size of the dough I initially put in the oven, I may have jumped for joy with a grin that only left my face once I had closed my eyes for the night—even then I’m sure there were remnants of a smile and maybe some bread crumbs too.
The biggest breakthroughs I had were a long time in the making, more of a trial and error that is still ongoing. The most difficult thing I found about making a beautiful loaf of sourdough was getting the bread to rise well, the nice crispy crust wasn’t so much of a difficulty. I posted a few weeks back about the little tricks I use to help the bread get a good rise. I picked a few of them up as I researched and tried to get to the bottom of why my bread was rising so inconsistently even though my starter was super healthy.
If I were to carry out this inquiry again, I would choose a recipe that is easy to scale up or down. What I mean by this is that it is easy to increase the size of the batch to make even more bread using less starter. The amount of starter I had to work with was always the limiting factor because the recipe uses quite a bit of it. The reason being that opening a bakery is an idea my wife and I have toyed with and having a recipe that is easy to increase and decrease the size of without the need for a large quantity of starter would be more than necessary—I know there are quite a few of these recipes.
Though I am very happy with the breakthroughs I have made with baking sourdough bread, there are other avenues I wish I had gone down. For example, I could have used this inquiry to further develop my understanding of musical theory and taken you along for the ride, or chosen an inquiry topic that would require me to spend more time outside–something that has been somewhat limited since Paul joined us a few months ago. The reality is that it would have been much harder to complete an inquiry that required a lot of leg work and travelling around.
Though I mostly stuck to a few applications of technology I learned about in education technology, I feel a lot more comfortable using different forms of technology in the classroom I would have probably avoided before. I’m grateful for this and look forward to the day when I have my own classroom where I can let the students creatively express themselves and their knowledge in a variety of ways. I thought I never would have said it but we may even go on a Minecraft field trip!
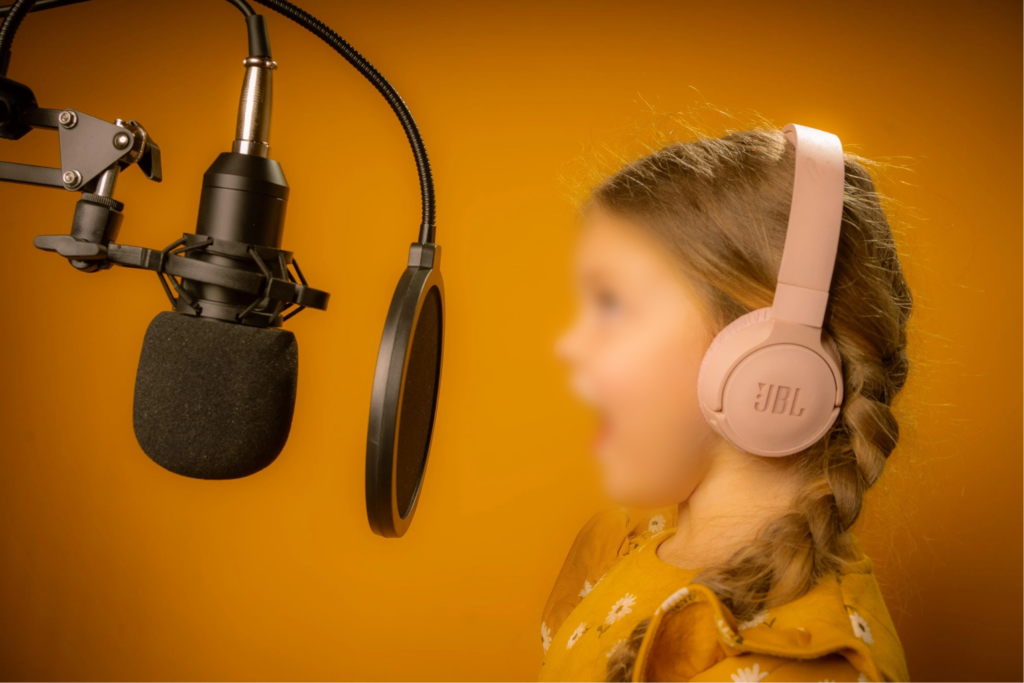
Inquiry-based learning is a powerful tool for helping students develop critical thinking skills and become more engaged in their learning. One way to incorporate this approach into the classroom is through the use of audio recording technology. Audio recording technology provides a way for students to capture their thoughts, ideas, and reflections in a way that is both personal and meaningful. Whether it’s using programs like Audacity and Garageband or using personal devices, this post, we will explore how teachers can meaningfully incorporate audio recording technology across grade levels from early elementary through middle school. We will also examine the pros and cons of using audio recording technology in schools, things to be mindful of as educators, and provide some ideas for different activities/applications in the classroom. But first, what is Audacity and Garageband?
Audacity Tutorial
Audacity is a free, open-source audio editing software that is available for Windows, Mac, and Linux. It is a powerful tool that can be used to record and edit audio, including podcasts, interviews, and music. Here is a quick tutorial on how to use Audacity:
Garage Band is a popular digital audio workstation software that is available on Mac and iOS devices. It can be used to create and edit music, podcasts, and sound effects. Here is a quick tutorial on how to use Garage Band:
While audio recording technology has many benefits, it also has some drawbacks. Here are some pros and cons to consider when incorporating audio recording technology into the classroom:
Pros:
Encourages self-reflection and critical thinking
Enhances student engagement and motivation
Allows for personalized learning and self-expression
Provides opportunities for collaboration and peer feedback
Develops communication and presentation skills
Cons:
Requires access to technology and may be expensive
May be distracting or disruptive in the classroom
May require additional training for students and teachers
May present privacy and security concerns
May not be accessible for all students with disabilities
Educators should keep the following things in mind when incorporating audio recording technology in the classroom:
Accessibility: Ensure that the technology is accessible for all students, including those with disabilities. Consider providing additional support for students who need it.
Safety and Privacy: Be mindful of safety and privacy concerns when recording and sharing audio recordings. Set clear guidelines for students and obtain consent from parents or guardians if necessary.
Training: Provide adequate training and support for both students and teachers in using the technology effectively and responsibly.
Assessment: Consider how audio recordings will be assessed and evaluated. Develop clear criteria for assessment and provide feedback to students on their work.
Integration: Integrate audio recording technology into the curriculum in a meaningful way. Consider how it can support and enhance learning outcomes in different subject areas.
Time Management: Plan ahead and allow sufficient time for students to create and edit their recordings. Consider how much time will be needed for training, recording, editing, and sharing.
Technical Support: Ensure that there is adequate technical support available in case of technical difficulties or issues that may arise during recording or editing.
Classroom Applications
You’ve weighed the pros and cons and have decided you want to use audio recording in your classroom. But, what can you actually do with it when you have a grade 2 class? What about a grade 8 class? Lots! We have sorted some example activities into Early Elementary(K-2), Upper Elementary(3-5), and Middle School(6-8) and are providing 5 examples for each below. This list of just some of the cool things you can do with audio recording across the grades:
Early Elementary (K-2)
Vocabulary Building: Students can create an audio book report by recording themselves summarizing a book they have read and discussing the vocabulary words they learned.
Cultural Exploration: Students can create an audio map by recording themselves describing the different parts of a map and the places that can be found there.
Literature Study: Students can create an audio storybook by recording themselves reading a story they have written and adding illustrations or animations to accompany the audio.
Music and Movement: Students can create an audio dance party by recording themselves introducing different songs and leading their classmates in dance and movement activities.
Poetry Reading: Students can create an audio poetry slam by recording themselves reciting their own poems or poems they have learned and adding sound effects to enhance the performance.
Upper Elementary (3-5)
Science Experiments: Students can create a podcast series where they conduct and report on their own scientific experiments, discussing their hypotheses, methods, and results.
Creative Writing: Students can create an audio drama by recording themselves acting out different parts of a story and using sound effects and music to create atmosphere and tension.
Public Speaking: Students can create a mock news show by recording themselves delivering news stories and features about different topics, such as sports, entertainment, or local events.
Language Learning: Students can create an audio language lesson by recording themselves teaching basic phrases and vocabulary in a foreign language.
Collaborative Storytelling: Students can create an audio chain story by recording themselves telling a story one sentence at a time and passing the recording to the next student to continue the story.
Middle School (6-8)
Speech and Debate: Students can create a podcast series where they analyze and discuss different persuasive speeches and debates from history and current events.
Virtual Field Trips: Students can create an audio documentary by recording interviews with experts and people from different cultures and locations, and using sound effects and music to create an immersive audio experience.
History and Social Studies: Students can create an audio timeline by recording themselves discussing the key events and people of a particular historical period and adding sound effects and music to create an engaging audio narrative.
Current Events: Students can create an audio editorial by recording themselves discussing and analyzing different news stories and events and offering their own opinions and insights.
Creative Writing: Students can create an audio poetry collection by recording themselves reciting their own poems or poems they have discovered and adding sound effects and music to enhance the mood and tone of the poems.
Thanks for Joining!
Just for fun, here are some fun videos that demonstrate the possibilities of audio recording and manipulation. These incorporate additional AI technology that superimposes a different face, and alters the voices to sound like a celebrity or politician. Would be cool to see a current events newscast where students assume the role of a well known newscaster or to take a ridiculous stance on an issue as Ryan Reynolds.
When I first started making sourdough, I would often end up with a loaf of bread that more closely resembled a brick than a loaf of bread and it took a long time and lots of trial and error to finally get a nice fluffy loaf every time. In this blog post, I hope to impart a few tips I have learned that can help you in your own sourdough adventures.
Rising Time
Something that’s easy to overlook is the amount of time it will take for your bread to rise and there are many variables that can impact how fast or slowly it does so. During the course of this sourdough inquiry into the perfect loaf of sourdough bread, it has been cold outside. As a result of this and the poor insulation in my apartment, my sourdough takes time to rise and sometimes even if I give lots of time to rise — 10 hours or more — it still doesn’t rise well. In spite of this, I have discovered a few solutions.
Extra Starter
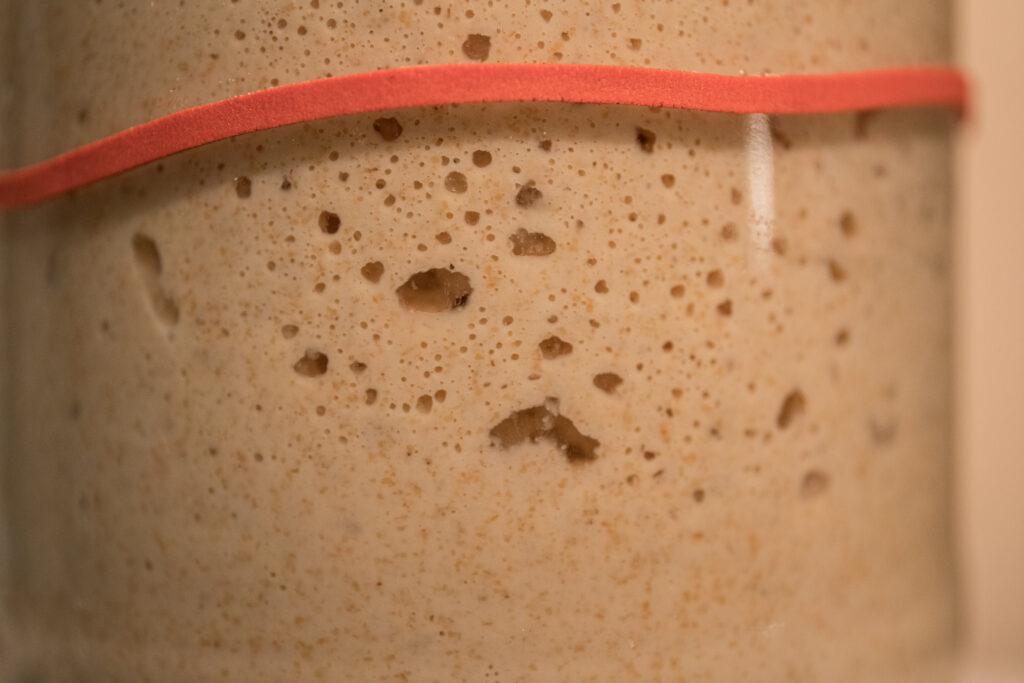
Another trick I use when my apartment is cool and I know it will affect the proofing of my sourdough is to add extra starter when making the dough. The recipe I introduced a few posts ago — my go-to recipe — calls for 100 grams of starter. I use 130 grams or more depending on how cold the space the sourdough is rising in.
Warm Water
Heat is a catalyst and when baking sourdough bread, it does wonders to speed up the rising time of a loaf. Though I haven’t tried hot water as I’m afraid it will kill the bacteria we rely on for it to rise, I often use water around 60 degrees Celsius.
Using a Damp Towel or Cloth
While you let the loaf proof, it’s important that you don’t let the outside of the dough dry out. This will greatly impact how it rises and will hold impede the spring — when it rises in the oven. To avoid this, I find a damp towel or cloth over top of the loaf keeps the outside of the dough hydrated so it keeps rising. If the room it’s rising in is cold, because of wicking, the cloth will be cool too. Keeping the cloth warm can help.
Notes/Extra Reading
Even if you use these tips to help your sourdough bread along, make sure the dough rises properly before you bake it, regardless of how long it takes.
For more info on how to improve how your sourdough rises, the following is quite helpful — True Sourdough
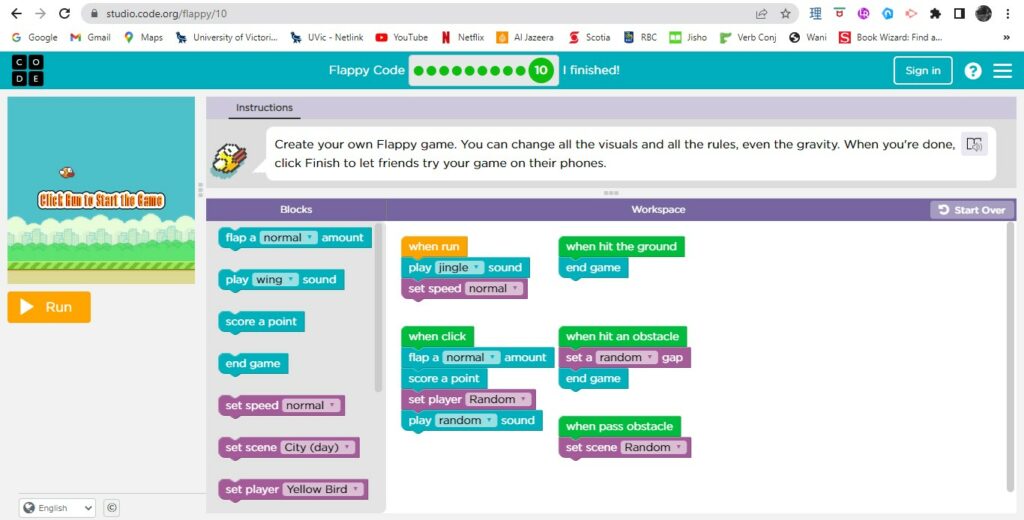
Coding is essentially plugging instructions into a system that tell that system what actions to perform and how to carry them out. The quality of the instructions determines how the task is performed and the quality it is performed with. This idea of following exact instructions was wonderfully expressed in the short video we watched during class about following exact instructions to make a peanut butter and jam sandwich. The children in this video are learning the value of clear, sequential instructions as their father makes sandwiches following their exact instructions with hilarious results — I feel for the little boy.
Though the focus of the lesson was on coding and computational thinking, which we often associate with mathematics, it made me think about how important making sure your expectations and instructions are crystal clear for your students. Sometimes leaving room for interpretation is important for fostering creativity, but in other situations, too much vagueness can lead to unfavourable results. Like the father in the video tormenting his children by following their instructions for making a pb&j sandwich exactly as they had written, I will use this activity as a segue into computational thinking and later into coding. Though I’ve never used it in class before, I can see it being very successful and wonderfully cross-curricular in nature.
During my hands-on time during class, I had a look at some of the coding programs available on code.org and tried one called flappy birds — there is a screenshot of my final challenge at the top of this reflection. I loved how interactive the program/game was and how it scaffolded computational thinking so well. Though I have never coded in my life, I understand the process a little better and if I kept working with these educational games, I’m sure I could get quite good at it. There was one program/game where you could choose to work with the computational language or code. How wonderful is this? For those of our students who are super keen, there are wonderfully scaffolded interactive programs, with varying difficulty levels, where they can hone their skills.
I look forward to incorporating some of the material I picked up in this class and putting together a few lessons and units I hope will be as informative as they are fun.
This week I made a loaf of super tasty, fluffy, and moist banana bread using sourdough starter. The recipe is rather simple and has been adapted from a Japanese recipe. This version of the recipe follows five simple steps.
Recipe
1 banana (105-120g)
Brown sugar (105g)
Vanilla extract (1 teaspoon)
1 egg
Sourdough starter (50g)
Flour (125g)
Baking soda (1/2 teaspoon)
Butter (62.5g)
Milk (30g)
The Process
Before you start mixing your ingredients together, set the oven to 350 °F.
Step One
Mix the banana, brown sugar and vanilla extract in a bowl until they are a well-combined consistency.
Step Two
Mix the egg into the batter.
Step Three
Add the sourdough starter and mix it in well.
Step Four
Mix the flour, baking soda and salt into the batter
Step Five
At this step, the butter and milk are added to the mixture. Once the batter is consistent, feel free to add any extras you wish. I added dark chocolate and crushed almonds.
Getting it Ready for the Oven
I chose to make this into a loaf and used a baking tray that I oiled and floured to avoid sticking.
Baking Instructions
Put in the preheated oven for 30-35 minutes at 350 °F. To check your banana bread, put a skewer in the middle of the loaf. If there is batter sticking to the skewer then it’s not quite ready yet. If there is no batter sticking to the skewer, it’s ready to come out of the oven and cool down.
Notes
I love this recipe because it’s super easy to make and absolutely delicious. The butter can be substituted with olive oil and the milk with oat milk (this is how I usually make it). I hope you enjoy it!
Our guest speaker this afternoon left me with lots to think about as I walked out of the class. Thoughts about my digital footprint and identity in social media, and the posts I have made in the past that could be used as fodder by potential students making their way around the web looking to uncover secrets about their teacher. It also brought up other thoughts about navigating using technology–photos in particular–to create portfolios and document learning in a way that doesn’t put me in a precarious situation. More than anything else, it made me think of the direction technology is moving, the speed at which it’s moving and what that means for young learners engaging with it and interacting. My thoughts here are on social media in particular.
The change seems to be almost too fast to keep up with and our guest speaker Jessie Miller seems to have taken a pragmatic approach to deal with it rather than advocating for moving away from the use of social media. But the question remains: what place should social media have in our lives and how should we embrace it? This isn’t just a question we should be looking at in the context of students and children because children see how adults use technology and tend to follow by example. So many of us are addicted to social media without even realizing it and only after checking the time do we realize how long we have been falling down the rabbit hole. The algorithms are set up in a way that directs us to content we may be interested in and we sometimes find ourselves endlessly consuming. This is not good. Next time you’re riding the bus just look around and see how many people are on their phones. If we are setting an example for our children or the young ones in our community, what kind of a model are we setting? Is this an example of behavioural addiction?
According to The Journal of Behavioural Addiction, although there are correlations between smartphone overuse and mental health issues like depression, stress, anxiety, and low self-esteem, the negative side effects of smartphone overuse are not the same as the presence of addiction. They also note one reason it may not be pathologized yet is that its effects have not been fully understood. With a little more research, I wonder what will come out. I wonder if likes on social media and listening to a few coins dropping from a slot machine will be found to have a similar effect on the brain. What would that mean?
Putting the addiction debate aside for a moment and going back to the idea of a digital footprint and identity. Whether we are conscious of it or not, when we post on social media we are putting together a representation of ourselves for the world to see–depending on our privacy settings. Elementary school students become high school students and shortly after high school, they become adults. If they aren’t taught how to be literate on social media and the internet, they may post something they regret, become victims of bullying, become bullies themselves, or any number of other negative outcomes. So where does this leave us?
Because the internet is almost unavoidable for anyone wishing to function in contemporary society, the impacts of one’s actions on the internet need to be fleshed out before a regrettable mistake is made. For this reason, digital literacy is extremely important and should not be overlooked and left to chance. But who should be responsible for this and at what age should it be taught? This is context-dependent and an area with far more than forty shades of grey. As our guest lecturer said today, “many children on social media are too immature to be on social media, but there are also many adults on social media that are too immature for social media as well.” At this point, it is an issue with far-reaching effects that runs through much of society and continues to get perpetuated with limited concern for the results of actions taken.
For myself and my child, I will spend time with him exploring the internet in a way that teachable moments don’t fade away into the abyss–interacting with technology in mitigated ways seems to be the best way forward. The harder you push, the stronger the resistance. It’s not going anywhere anytime soon so I embrace it in intentional and meaningful ways that act as a healthy model for my child and my students.
Although sourdough is enjoyed around the world in the many ways it gets baked–whether it’s bread, pancakes, muffins or any number of baked goods–its humble beginnings go back further than you might imagine. Around 3000 BCE on the banks of the Nile river in Ancient Egypt, wheat and other grains were cultivated to provide for the growing populations. It was at this time that the first loaves of sourdough bread were enjoyed. There are many depictions of bread and the process of bread-making in Egyptian hieroglyphs, sculptures, and other artifacts. Archeologists found ovens where sourdough bread was made and even discovered yeast cultures the ancient Egyptians used to leaven their bread.
A sculpture of an Egyptian woman making flour. Photo from BBC
With strong trade throughout the Mediterranean sea, it didn’t take long for sourdough bread and the process of bread making to make its way out of Egypt. The Greeks imported whole wheat from Egypt and Sicily and in a short period of time completely revolutionized the technology and equipment for making sourdough bread was made and it quickly became a staple of the Greek diet. It continued to become more and more prominent in different cultures as food for daily consumption and was eventually adopted by the Roman military. Interestingly, many of the first bakers in Rome were freed slaves who took up the occupation of professional bakers and began forming their own guilds. As Rome expanded its territories and moved further into northern Europe, they brought sourdough bread with them.
Though bread became less prominent during the barbarian invasion because of the lack of access to flour, the secrets were held in the monasteries and began to reemerge in the 12th century with the rise of the baking profession in France. Eventually, barm–ale yeast–became a popular replacement for sourdough because of how much easier it was to use in the bread-making process. Making sourdough bread is a very time-consuming process and technologies–alternative yeast supplements–changed how bread was made. In the 19th century compressed yeast–bakers yeast–almost completely replaced sourdough starter for leavening bread because it was so much easier and less time-consuming.
Introduction to North America
During the gold rush in California, sourdough was introduced in San Francisco around 1849 and eventually made its way to Alaska and western Canada. It was popular with the miners because they often lived in drab conditions that tended to work in favour of sourdough bread and because sourdough tends to be more nutritious than bread made with bakers yeast–it was probably also due to access.
With so many different technologies available to teachers in their classrooms, learning how to evaluate their usefulness is extremely important. From my personal experience, I can remember very clearly my elementary school teachers wheeling in the big TV’s so we could watch movies. Sure, they may have been educational, but did they enhance our learning? I’m not sure, maybe they did? A great way to assess the usefulness or effectiveness of a technology being used for educational purposes is the SAMR model. The 4 parts to the SAMR model are: Substitution, Augmentation, Modification, and Redefinition. Using this model, educators can better understand what kind of an impact the technology is having on their learners and whether it is adding to their educational experience or not.
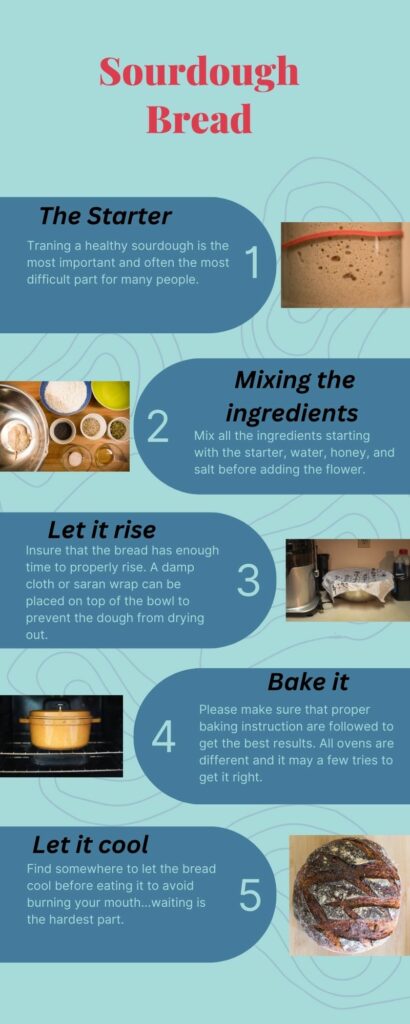
An example of how Canva can be used to create eye-catching graphics
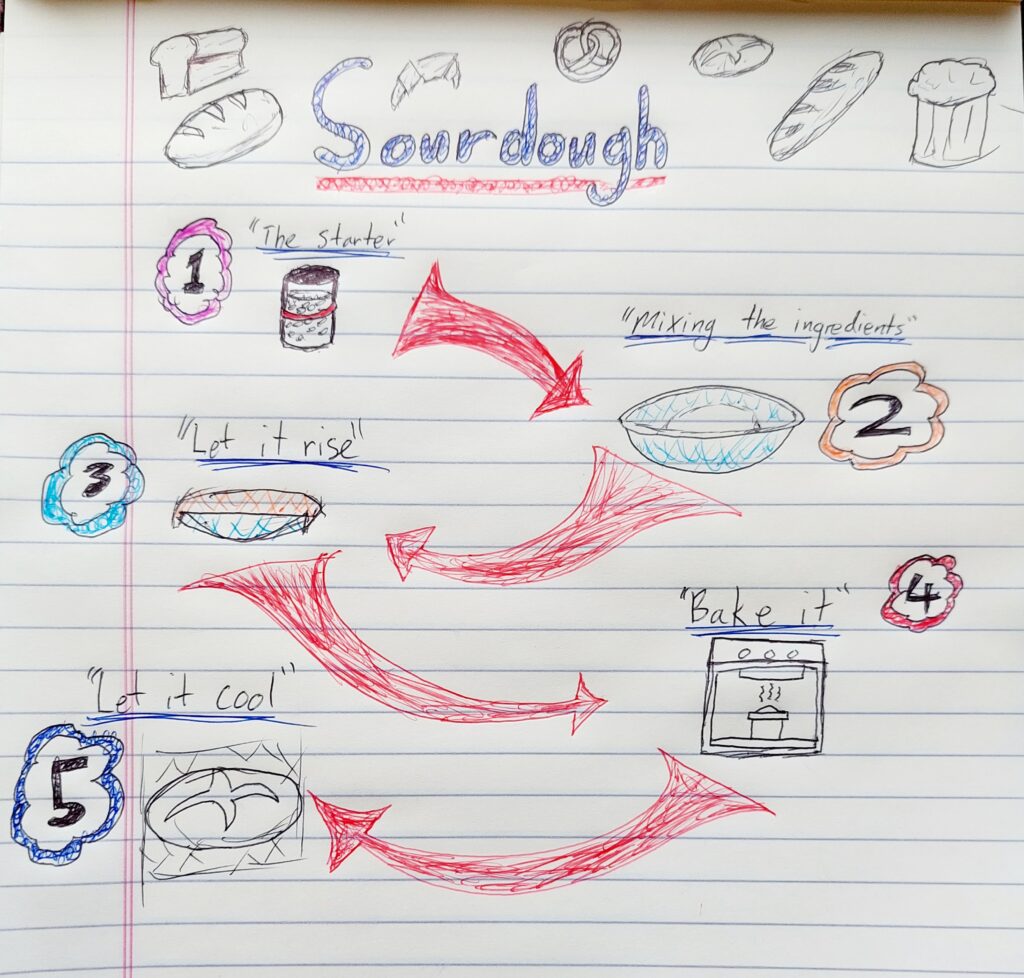
An example of a sketchnote made on paper and uploaded.
Let’s take an Ipad for example. You can make notes on an Ipad then post it online for your students to see. Well, you can do the same thing with a pen a paper — just take a picture of a drawing and upload it (there is an example of this in the above image I created for the process of making sourdough bread). In this instance the Ipad is merely a substituion for a pen a paper. If you were to use the Ipad to create an animation however, you would be moving into the territory of Redefinition whereby the technology is being used to create something completely new. When technology is used in the classroom like this, students have the chance to really take ownershipo of what they do and mark it with their own creative flare.
In my own practice, I will keep this model in mind to make sure the technology I’m using in class is actually offering something to my students. Sure, sometimes it can be nice to have some form of novelty in the classroom to shake up the routine and add a little spice, but the real challenge is making sure that the novelty is more than just that.
This week in Ed. Tech we looked at assistive technology and making our technology inclusive and as accessible as possible. This is such an important topic and I am glad that I now have a few tools I can bring forward with me into the classroom. Often we take for granted assistive technologies, and sometimes we aren’t even aware that we are using them.
When I first moved to Japan 7 years ago, I couldn’t speak a word of Japanese, let alone read any of the three alphabets. This made simple things like grocery shopping difficult. Sure, you can see what the products look like but you don’t really know what they are until you take a bite of nato for the first time expecting it to taste like baked beans — they may both be beans, but they are very different. I often used a text translation app to make sure I knew — with some degree of certainty — what I was buying. Similarly, I was diagnosed with Crohn’s disease while living in Japan and had to undergo emergency surgery. Though my partner was bilingual and could help me most of the time, there were occasions when I used a translation app to help me understand medical Japanese (I could eventually have these conversations with my doctor without using a translator).
In the classroom setting, I can see myself trying to make things as accessible as possible without making them too easy for my students. Everyone has different strengths and weaknesses and making sure there is common ground and equal access among students with differing abilities is essential to a healthy classroom — and a value I hope the students take forward with them.
This is a video I made for my weekly inquiry project.
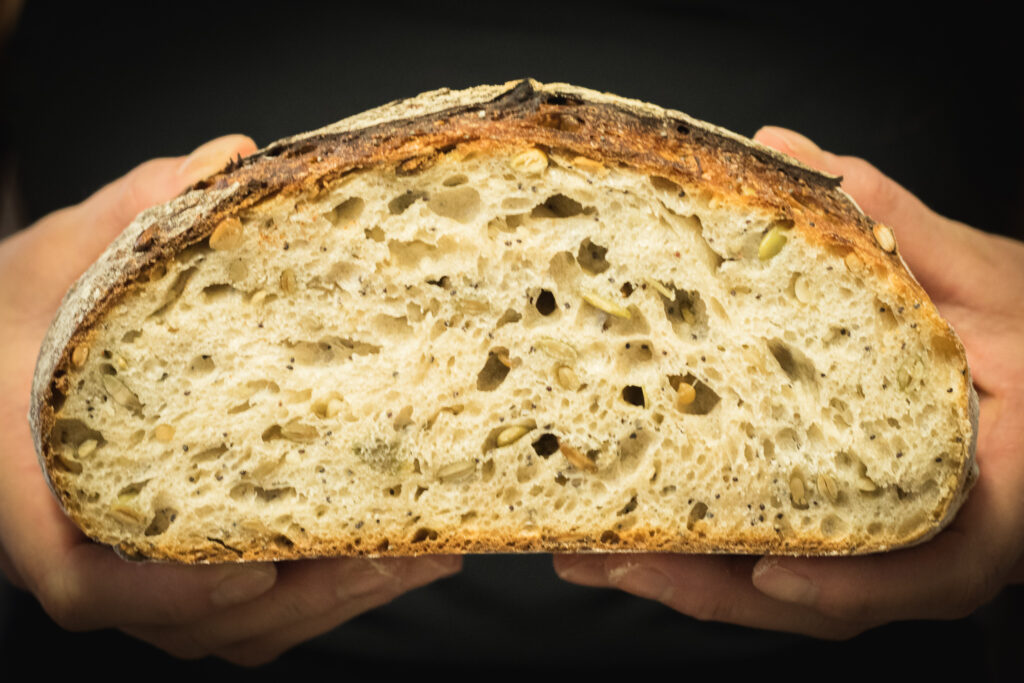
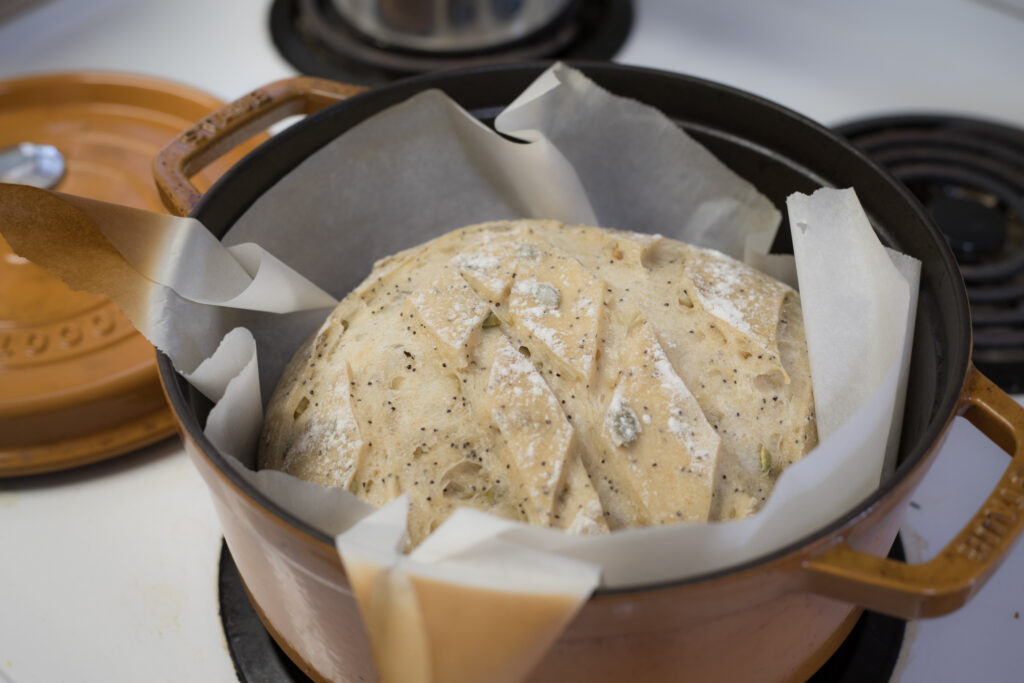
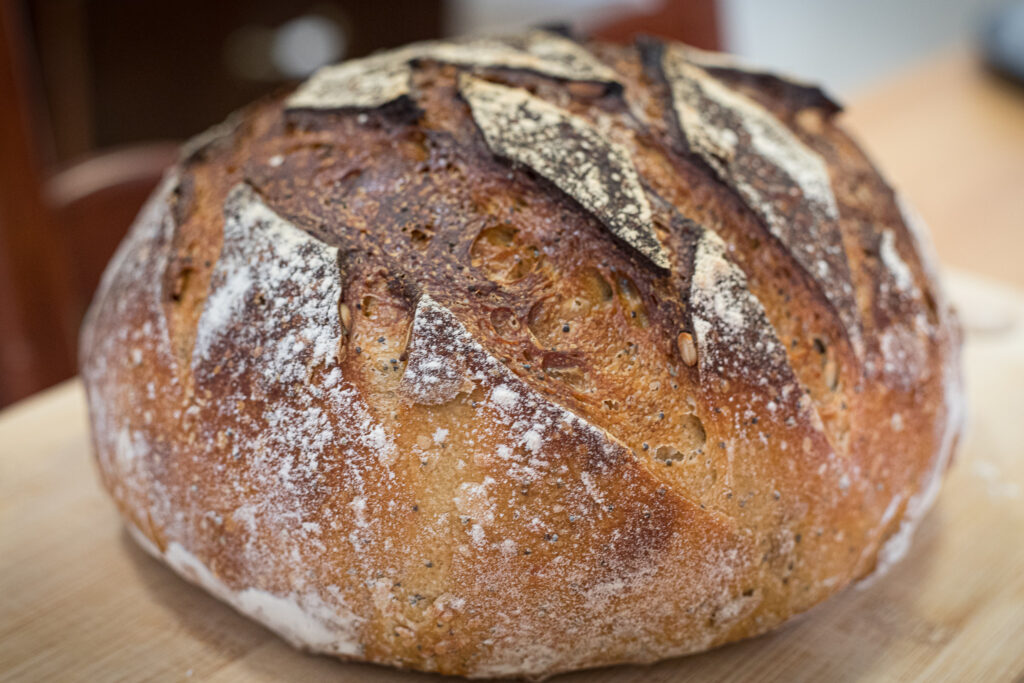
Today I will be taking you through the process of making my go-to loaf of sourdough bread. Though the process is long, it’s totally worth it if you like soft tasty bread with a crunchy crust!
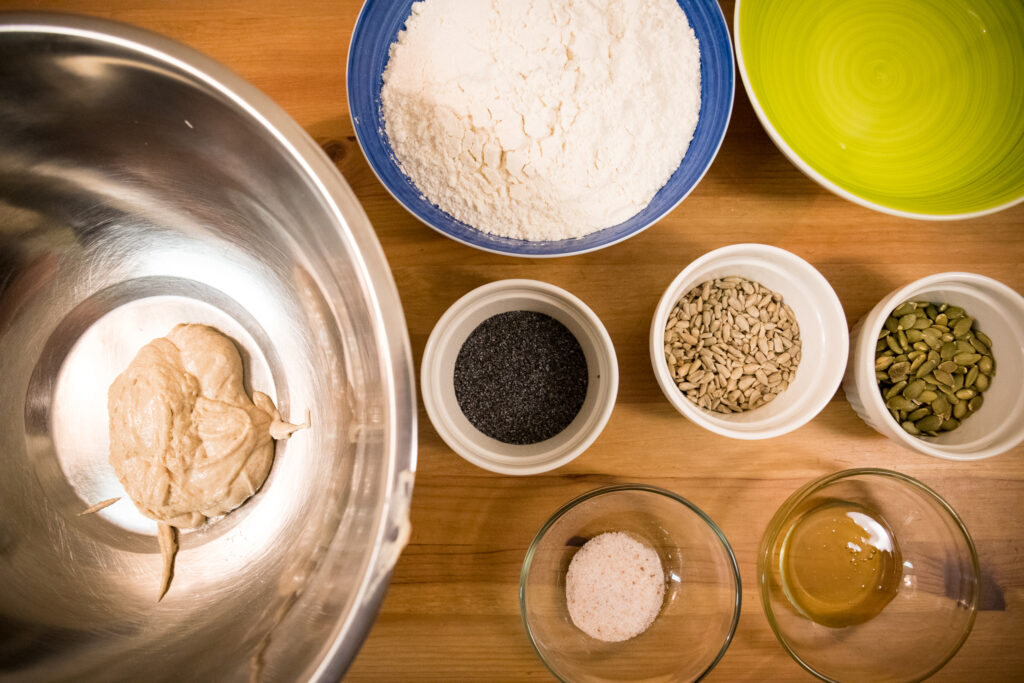
Ingredients
Sourdough starter — 100 grams
Water — 240 grams
Salt — 10 grams
Honey — 30 grams
Flour — 400 grams
OPTIONAL — add any seeds/dried fruits you would like.
Note: If you wish to add dried fruits to your bread, you may need to use more water because the dried fruits will rehydrate and use the water required for the bread to rise.
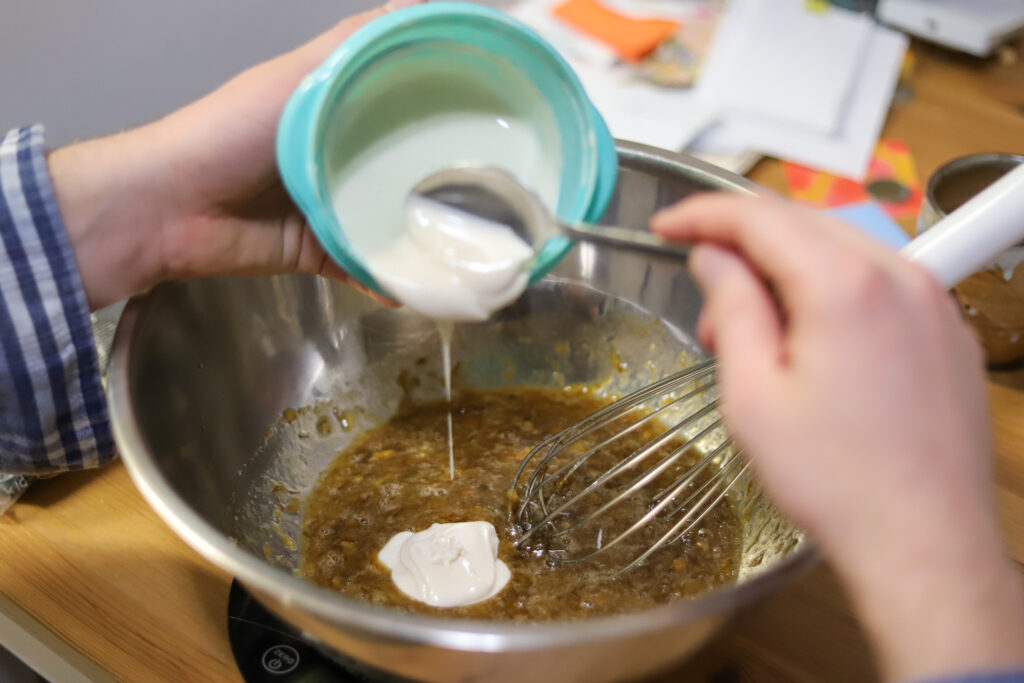
Mixing the ingredients
This is the process I go through when I mix all the ingredients together.
I mix the starter, water, salt, and honey together before adding the flour and seeds because I want the starter to be evenly spread through the dough. This will help ensure an even rise in the dough. Once all the ingredients are mixed together and the dough is shaggy, let it sit for 15 minutes. Then stretch and fold the bread every hour for 2 more hours — three folds in total.
Folding the bread
When you fold the bread, make sure you are folding it on the same side and folding it toward the center of the bread. If you’re unsure, the video to the right is a good demonstration.
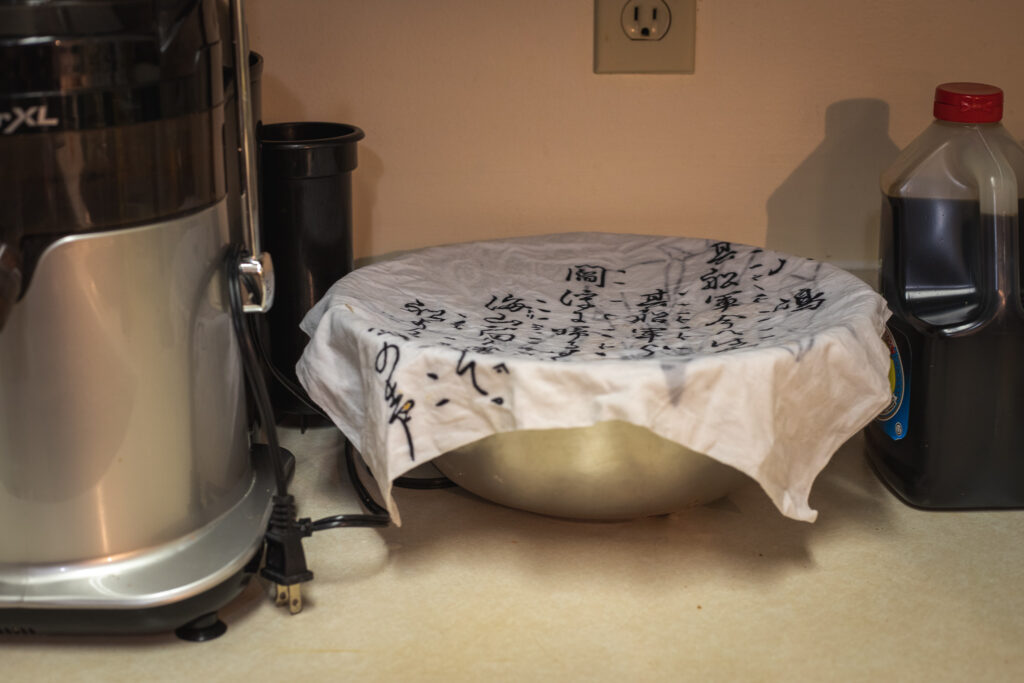
Letting it rise
Before the bread is ready to go into the oven it needs to rise. I usually leave my bread to rise overnight in a metal bowl with a damp cloth over top of it to stop it from drying out. It only needs about 3 hours to rise, so you do not have to leave it overnight, this is just a part of my process.
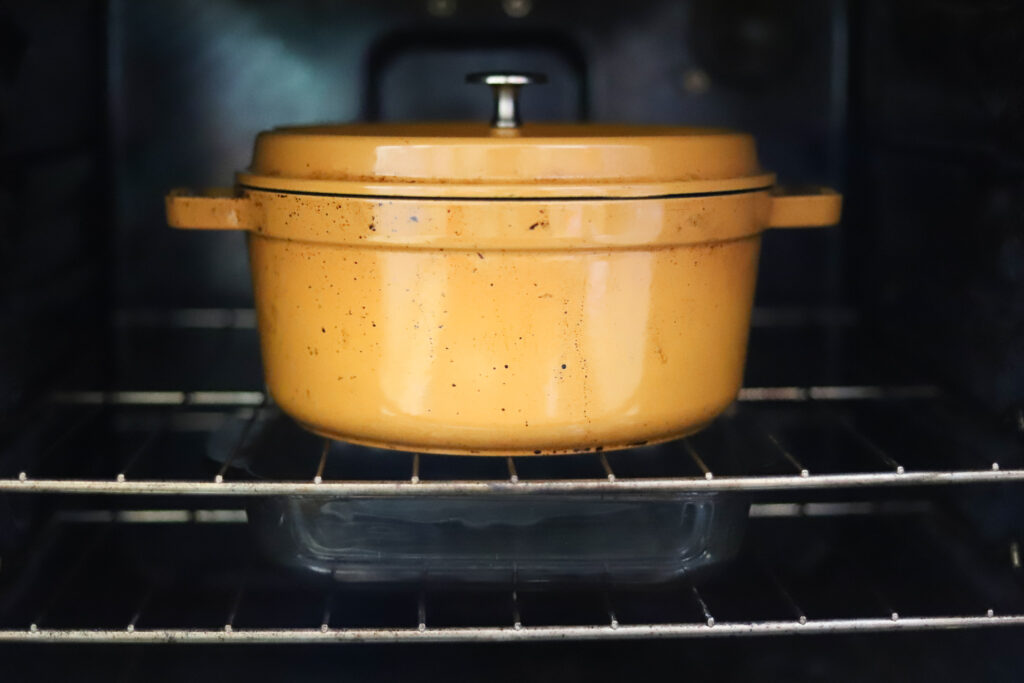
Before the bread goes in the oven
Before the bread goes in the oven, you need to preheat the oven to 500 degrees Fahrenheit, put a Dutch oven in to heat up, and put a glass dish with water to keep moisture in the air. This helps form a nice crisp crust without burning it.
Score the bread before putting it in the Dutch oven, and in the oven itself. This will also help it as it rises.
Baking
There are two phases to baking this bread.
In the first phase, the loaf is in the dutch oven with the lid on it baking at 500 degrees Fahrenheit for 15 minutes
In the second phase, the lid comes off the Dutch oven and the temperature is lowered to 450 degrees Fahrenheit for 35 minutes.
There you have it!
I hope you found this tutorial helpful. Up until now, this is my favourite loaf of sourdough to make, but I have a few new recipes I’m excited to try in the weeks to come!!!